
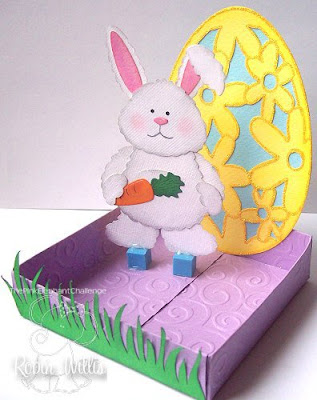
My name is Robin Willis, I am co-owner /design team member of The Pink Elephant. I decided to make a cute little candy dish to display at Easter time. I hope you enjoy my tutorial today! If you have any questions, please don’t hesitate to ask.

Sweet Bunny Candy Dish
Designer: Robin Willis, TPE design team
Supplies:
Cascata cardstock – pink, yellow, blue (WorldWin Papers)
Treasures cardstock – Pure White (WorldWin Papers)
Colormates cardstock – Medium Lovey Lilac, Dark Grassy Green, Dark Orange Dream, Heritage Black
Easter Bunny die set (Quickutz: available exclusively at Scrapyland.com)
Cuttlebug & D’Vine Swirls embossing folder (ProvoCraft)
Silhouette Digital Craft Cutter & Grass, Easter Egg files (Quickutz)
Teen Font
Butterfly Punch (Martha Stewart)
Stickles – Cotton Candy, Yellow, Lavender, Star Dust (Ranger)
Colorbox Fluid Chalk Ink – Charcoal, Warm Green, Pink, Orange (Clearsnap)
Decorator Chalk (CrafT Products)
Top Score Board (Crafter’s Companion) or other scoring tool
Ribbon
Two tiny plastic cubes (or something to elevate bunny)
Adhesives-thick tacky glue, tape runner, glue pen, pop dots
Scissors, paper trimmer, ruler, pencil
Easter grass
Candy to fill your dish
Whew! That is a long list. I swear this isn’t that labor intensive; I just used a lot of stuff!! Now, let’s get started! I just know you want to make one of these for your table!
- Using the bunny die and the Cuttlebug, cut out the bunny in white, and cut the insides of ears and nose in pink. Ink edges of bunny (gray around white areas and pink on the pink cardstock). Use a Q-tip to add chalk to bunny's cheeks. Cut out carrot and ink edges with orange and leaves with green. Assemble bunny. Glue feet to the two cubes to make him taller. Set aside to dry.
- Cut out Easter Egg on Silhouette: main egg in blue and overlay in yellow. Glue two pieces together and go around edges of yellow cardstock with Stickles. Set aside to dry.
- Take 12x12 sheet of Lilac cardstock and draw a pattern like this:

- Cut out pattern and score all lines for easier folding.
- To emboss the box, I had to be a bit tricky. I embossed one side at a time. I folded in the side panels so it would fit through the machine. Then, placed the folder on one end, lining up the edge of the embossing to the score line where the bottom and side meets. I am terrible at explaining things. But, I did make a diagram that I hope helps explain this a bit better:

And here is a photo that I hope might be a bit helpful: 
- Fold up the box according to these instructions:
Working on shorter sides (the ones without tabs), fold up and pull tab over and adhere to side on the lower one inch segment. Take the top one inch segment and adhere it down over the tabs to make a clean side. Repeat with opposite side of box.

Bring down one longer side. Pinch the two one inch segments together and press the 2 inch part into the bottom of the box.


Repeat with opposite side and you have a finished box. If you aren't covering this with Easter grass, I would suggest cutting a panel slightly smaller than 4"x4" and covering the bottom to make it look neat and tidy. Excuse the pencil and pen lines. I just made this one for photo purposes. You wouldn't be so careless when making one to use for this project. I am also not a step by step kind of girl, so while this one is green, my finished one is obviously lilac.
- Glue egg to the back inside of box. Glue bunny about an inch in from the edge at an angle. Cut 2 strips of grass on Silhouette and ink edges. Glue them (in two separate directions) across the front of box. This is what it will look like at this point:
 Don't worry about the seam in the middle or the ugly blue plastic cubes under the bunny. That will be covered up with Easter grass later on. Also, this only has one strip of grass, I added a second one with the blades going the opposite way for more depth and interest.
- Glue checked pink ribbon around the box bottom.
- Cut out “Happy Easter” and shadow on Silhouette. Glue together and add to front of box with pop dots. Color letters with Stickles.
- Punch out a pink and a lilac butterfly. Cover with Stickles. When dry, fold up wings and attach to Easter egg by the body only.
- Tie bow with lavender organza ribbon and add to bunny.
- Add Easter grass and yummy candies!!
 I really hope you like this tutorial and will maybe want to try to make one of your own. Variations of this could include using a premade box rather than make your own or use different embellishments for other holidays and seasons.
Don't forget to check back at noon EST to see another fabulous tutorial. Also, remember we have the mini challenge, a game (with another coming later tonight) and the blog hop to the designers' blogs going on too. There is lots of fun things going on and we don't want you to miss a single one!
Happy Hoppin!
-Robin Willis
Don't forget to scroll down for the mini challenge, blog candy hop and Find Ella game!
15 comments:
so very cute Robin!
hugs
Anne x
Super cute Robin. Thanks for sharing tutorial on this cutie. Going give it a try later.
Happy Spring
Nettie
Robin this is adorable!! Thanks for the tut!!
This is a THE CUTEST!!! I love it. How cute would this look on my table??!!! Oh and you have my utmost respect for being able to create the box and pattern for it lol. I cannot even measure a straight line!! Awesome tut and thanks for sharing!!
Robin,
This is just so sweet, what a great treat box alternative to the store bought baskets.
Thank you for this idea, Lori m
great idea Robin, now I want all those sweeties to eat!
AllisonX
omg Robin, that is the CUTEST thing ever!! I think I need to go buy that bunny QK Die now!!
oh wow Robin this is just gorgeous - really really amazing.
I love it and I want the sweeties too.
Ann xxx
I absolutely love it!! Great tutorial & beautiful results! Terri
gorgeous sweetie holder :-)
lorraine
fantabulistical tutorial and wonderfully cute sweet holder !!
awesome ! smiles W
This is adorable! Thank you so much for the tutorial.
Wow ... what a fantastic tutorial. I can see this one being pulled out and adapted for Christmas this year.
Thank you for sharing.
Luv'n'Stuff
Max
xx
So cute, now I want that dish w/the goodies in it..LOL
Maggie
Adorable project Robin! You did a fantastic job on it!!
Jennifer :)
Post a Comment